
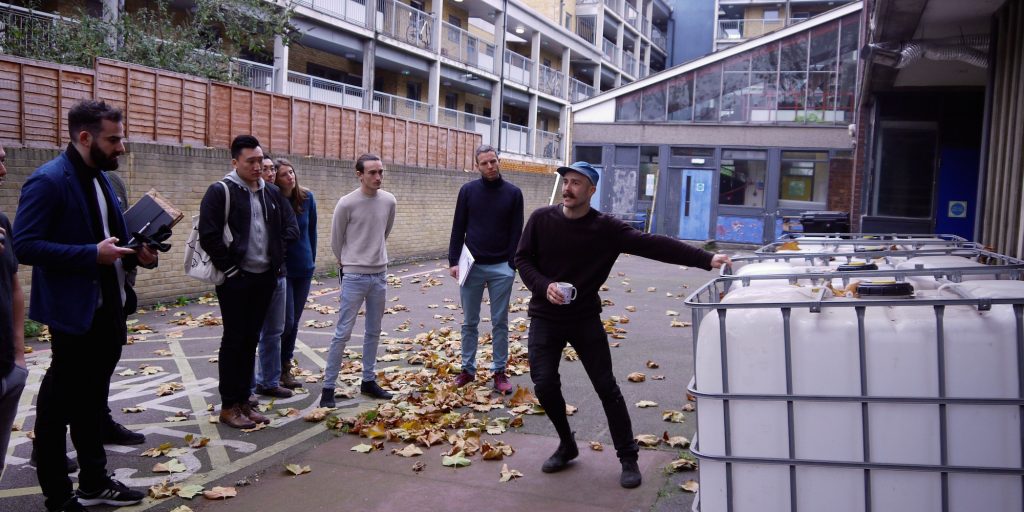
Jonathan Katona, trainer and self-taught aquaponist at Green Lab in London. © Elsa Ferreira
At Green Lab in London, we attended a workshop to create an aquaponic system. In order to be an aquaponist, you need to know a bit of everything: chemistry, design, plumbing and mathematics… we reviewed the basics.
London, from our correspondent
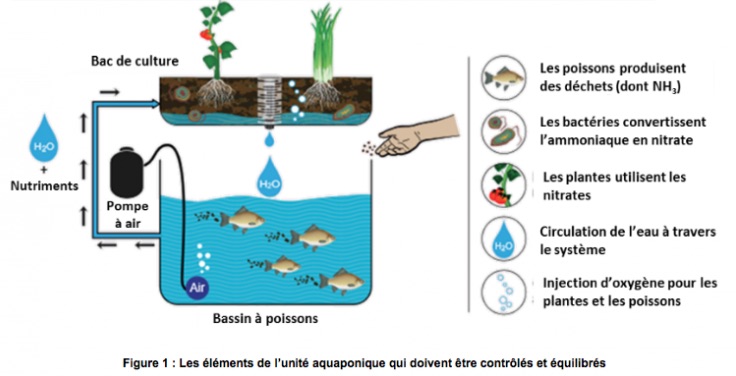
It’s a classic project for fablabs and DIY enthusiasts: aquaponics, a system that leverages both fish farming and vegetable growing. The idea is to “act on the ecological loops that exist in nature,” explains Jonathan Katona, our trainer and self-taught aquaponist. The excrement from the fish is transformed into nitrate by bacteria and then used as fertilizer for the plants. The plants act as filters to clean the water for the fish. “It’s very accessible and very DIY, which is why it’s so fun.”

This Saturday morning in November, 15 people have come to attend the “Introduction to urban aquaponics” workshop at Green Lab, a food tech lab in London that we wrote about recently. Some of the participants work as landscapers or as science or biology professors hoping to teach this technique to their students. Others, like James Hubbard, who has degrees in geology and earth sciences, are exploring this culture to see if there is a commercial opportunity, as long as it can effectively scale up.
“You can absolutely use aquaponics on an industrial scale,” confirms Jonathan. “There are a few places in the UK. Lots of things are happening in the U.S.” Moreover, he adds, the UK’s largest aquaponics farm, GrowUp Urban Farms, is situated in London. It was one of the reasons he first took an interest in this new agricultural technique. “It’s efficient, sustainable, and you can do it in an urban environment, where most people will be concentrated.”
Today, we’ll study a DIY version of aquaponics. “Most important is the network, human resources,” insists the trainer. “You need to test ideas, exchange stories, either horror or success, and in the end, you will be able to exchange food.”


“It’s easier than it looks,” Jonathan says encouragingly. “It’s doesn’t cost a lot to set up a small system. Go ahead and learn by experimenting. It will be faster and easier.”
Materials
– Large plastic container, around 20€
– PVC pipes, around 20€
– Water pump, around 30€
– Clay beads, 10€ for a 20L bag
– Plants of your choice, around 10€
– Fish, less than 5€ per fish.
Step 1: basic chemistry
Did you know? Ammonia is very toxic for fish. But ammonia is also produced by their excrement. That’s why their water needs to be changed regularly so that they don’t end up belly up.
This is where the genius of aquaponics comes in. The bacteria that develop in your culture tray will absorb the ammonia and transform it into nitrate, which will serve as fertilizer for your plants. The plants will filter out clean water for the fish. “This process has to be very quick,” says Jonathan. “At least one complete cycle, if not two, per hour. If the fish remain in their excrement, it quickly becomes toxic.”
Step 2: design
There are various designs for aquaponic systems. The basic elements are fish, biofilter (bacteria) and plants. You can choose a system that is spread out over several locations, a tidal system with a water level lower than the culture tray (the most simple system), or a system based on constantly moving water or deep water.
To plan your system, Jonathan recommends the 3D modeling freeware SketchUp, which you can use to calculate how much equipment you need to build a given construction.
Step 3: fish
In theory, you can choose just about any fish. But be aware of their tolerance for variations in temperature and decide whether or not you want to raise the fish to eat. Goldfish are good to start with, but they’re not edible, Jonathan reminds us. Tilapia have high tolerance, grow fast and taste good, but it’s a tropical fish, so you’ll need to heat the water. On the other hand, trout prefer cold water, which is difficult to maintain in summer.
Once the fish have been selected, you need to feed them. Two solutions: either buy commercial fish food, which is rarely organic or sustainable, or else make your own food. For example, you can cultivate duckweed, an algae that floats on still water. Be careful, too much duckweed can deoxygenate the water in the streams they colonize. But they’re made up of 40% protein and constitute a good diet for the fish. So picking some up is a win-win solution.
Green Lab also plans to set up an insect farm, which can also be used to feed the fish. “We’re going to do a test on fish fed with our larvae and fish fed with insects to see the difference.”
Step 4: building the container
Time to roll up your sleeves. As it would be difficult to provide a complete step-by-step guide here, we’ll just offer some broad guidelines. For the rest, there are many online resources, such as this one:
Building your aquaponic system, by Rob Bob:

Choose a large plastic container (Jonathan’s holds 220L). Check what it contained before, as plastic absorbs some toxic substances. Jonathan’s tip: “If it smells sweet, there’s a good chance it’s suitable.”
Buy a pump to create movement and carry oxygen to the water. It should refresh the water in the aquarium at least once an hour, twice if there is a high density of fish. To calculate the minimum water flow rate, you can download a tool on aquaponie.net.
Cut the container to make a culture tray, leaving 15-30 cm at the bottom for the roots.

Insert a siphon to automate filling and draining the culture tray. Take care when attaching the siphon to the inside of the culture tray. Once the plants are in place, it will be difficult to fix any leaks.
Step 5: building the biofilter
Place a substrate inside the culture tray. It will support the nitrifying bacteria. Jonathan recommends clay beads, which are light and full of air bubbles. “They have the texture of a basket ball, which leaves a lot of space for the bacteria to colonize them.”
Once you’ve built the system, you need to let it go through one cycle before putting the fish inside, Jonathan explains, in order to grow the bacteria (biofilter) necessary to process the fish excrement. For more details on each step, refer to Wikihow.
The cycle is complete when the levels of ammonia and nitrite are close to zero and the level of nitrate is rising. Now you can add the plants and fish and monitor their activity.
Step 6: mathematics
Time to calculate how many fish are required to power the system. The fish excrement must be proportional to the nutritional needs of the plants. The equation that is used to calculate this ratio is called the food coefficient.
Example: I have 2 square meters of culture space. I want to use 1 sq.m to grow leafy green vegetables (50g of nutrients per day) and 1 sq.m for fruiting vegetables (80g of nutrients per day). So I need 130g of nutrients per day. An adult tilapia can weigh up to 500g and eat up to 2% of its bodymass each day, or 10g of food. So I will need 13 fish to create enough waste for these 2 square meters of culture space. If each fish requires 20L of water, I’ll need a 260L aquarium.
More info on the “Introduction to urban aquaponics” workshop at Green Lab in London (next session on January 27, registration £36)
Managing aquaponic systems, explained by FAO (Food and Agriculture Organization of the United Nations)