
The petit fablab de Paris.© Quentin Chevrier
What equipment to buy, how to convince the town council, whom to entrust the keys to, what legal status to choose… Opening a fablab can seem like writing an impossible quiz. A number of online resources exist. Makery selected four of them.
10 commandments
Massimo Menichinelli is an Italian researcher, founder of openp2pdesign, a search website on the design of processes and tools for communities and their open projects. In an article published in 2013, he listed the “10 things to do to open a fablab”.
1. Start off from the local context and its specificities.
2. Identify your community and get it involved.
3. Develop service, business models and finally the business plan.
4. Beware of hidden costs! Security, service charges…
5. There are always setbacks. You must show patience.
6. Not be alone, not be more than 3 or 4, not bite off more than you can chew.
7. Chose your machines according to the FabFoundation list. Prefer the laser cutter and the digital milling machine to the 3D printer (which is more a communication tool than a real production tool).
8. The technical skills of the team prevail over the quality of the machines.
9. So as not to reinvent the wheel, get support from neighbouring labs, pay them a visit, record good practices.
10. Test everything and carry out a few test-projects before opening.


The 10 detailed recommendations from Massimo Menichinelli (en anglais)
3 fundamental questions
Alessio Biancalana, accustomed to fablabs, determines the good start of a fablab with 3 fundamental decisions.
Autonomy or sponsor : Autonomy often requires a great deal of volunteer work (and therefore limited free time for the members of the team), a compulsory financial contribution for members and a balanced budget sometimes difficult to maintain. However, the freedom it offers facilitates a quick start to the project, a nimble governance of the fablab, and the leading of the structure in perpetual beta test mode. On the opposite, the sponsored fablab is built with a perpetual challenge: “remain neutral”. In other words: be capable of saying no, respecting the values of the fablab and satisfying the sponsors without compromising the project. On the other hand, a sponsored fablab is more stable financially (otherwise this solution has no particular interest).
1,500 dollars of equipment, at least: For Alessio Biancalana, there is no obligation, no absolute list. The fact remains that: “It is difficult to imagine a prototyping place without the triptych 3D printer, laser cutter and digital milling machine.” Even though there is always a new machine to buy, whatever the lab budget, 1,500 dollars can be enough to acquire the minimum equipment.
In order to raise money, Alessio Biancalana suggests you supply services to other labs (of course all labs cannot function like this…), training services to private individuals and/or companies, equip yourself with an incubator, sell a product from the lab (or a service, the ideal being to replicate this production in other fablabs).
Alessio Biancalana’s article in Open Electronics
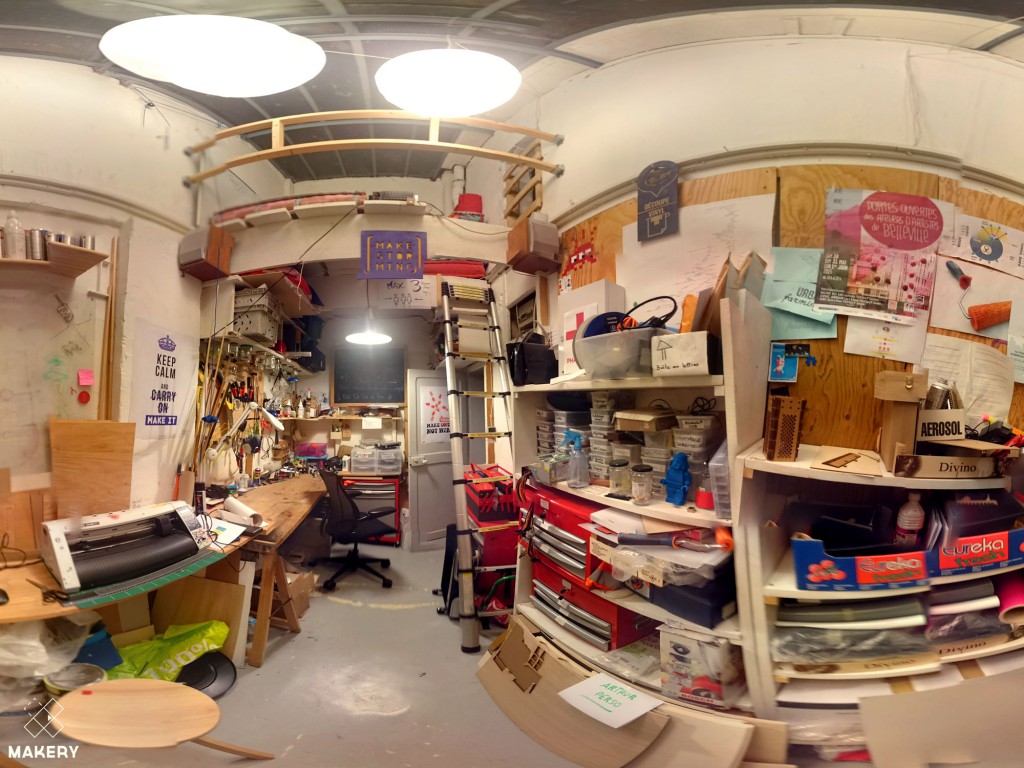
360 degree view of the Petit Fablab de Paris, zoom in and out and move around by clicking and making your cursor slide:

7 days to open your fablab
The Amersfoort Fablab in the Netherlands shares its recipe to set up a lab and get off to a great start. By “skipping one year of preparation, grant applications, administrative meetings”. A 7 day recipe for 5,000 euro. The idea is to get a move on, set up anywhere (use the garage of one of its members, squat an unoccupied building…), order simple machines, with modest dimensions, even if you have to assemble them yourself, but also look around electronic shops and companies to go through their bins.
Harmen Zijp, behind this tutorial in 2011, is aware of the limits of the exercise. “In principle, it is possible to keep this schedule, but be prepared all the same for several setbacks and frustrations.” The idea remains: repetition and do-ocracy at full speed so as not to get bogged down in decision and validation processes. A bird in the hand is better than two in the bush.

The steps 9 of the Fabfoundation
The 9 steps of the Fabfoundation focuses on institutional links to secure the project through partnerships.
1. Find a place to host the fablab (institution, school, community centre…).
2. Find a « champion », the leader of the fablab.
3. Set up partnerships (Fabfoundation/MIT, city council, region, sponsors…).
4. Secure funding via the partnerships.
5. Find and prepare premises that are as accessible to all as possible.
6. Equip, set up and put the fablab in operation (the lab is not open yet).
7. Train the team and train to train.
8. Identify projects (by solving a local problem as far as possible).
9. Fire off! Launch the fablab with an opening ceremony, making sure you invite sponsors, partners, local elected representatives, so that they understand what the lab is and see for themselves the first projects carried out.
The 9 steps on the Fabfoundation website
You have also set up a fablab? Share your experience in the comments!
Additional resources:
How to equip your lab with 1,500 dollars (article from 2009)
Advices and examples of fablab launches by Bart Bakker, creator of the Minifablab in Holland