

Welcome to the “15 minutes of anonymity” to which we will be entitled as citizens. © CC-BY-SA Zabou
As a new law on information security is passed in France, it becomes increasingly urgent to dodge digital eavesdropping and data sharing. TailsOS is an anonymizing and amnesic operating system thats fits on a USB key. This (advanced) DiY guides you through the steps to install it.
“In the future, everyone will be entitled to their 15 minutes of anonymity.”
Jean-Marc Manach (2010)
Welcome to the future via Tails. Jean-Marc Manach’s words from 2010 seem almost prophetic five years later, as France voted as recently as June 9 the latest articles concerning information security, while in the U.S., citizens implore the NSA to cease its mass surveillance… As Pas Sage en Seine, Futur en Seine festival’s own hacker event, calls for an open debate on civil liberties in the age of Snowden, Makery chips in a little step-by-step tutorial to install TailsOS on PC (or more precisely, on a USB key…).
Tails is an anonymizing and amnesic operating system that fits on a 4MB USB key under Linux (or on a CD, or an SD card) and runs on PC, Mac and Linux. This tutorial is aimed at people using a Windows PC, but there are other tutorials for Mac and Linux.
Prologue: secure the installation
To prevent an attack from the Man-in-the-Middle, a scenario in which hackers (or the NSA) intervene between the computer downloading Tails and the server that distributes it, we recommend using PGP (Pretty Good Privacy), a protocol that basically allows you to compare the downloaded file with the one the server intended to send you.
Step 1 is aimed at advanced and meticulous users. To go straight to the basics, start at Step 2.
Step 1: install and verify GPG4win
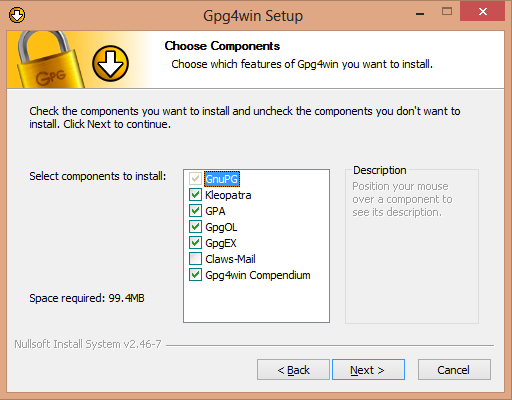
Download GPG4win 2.2.4, a Windows software that verifies the authenticity of an installation, as well as its OpenPGP signature (just below the green download button). When installing, make sure the Kleopatra box is checked (as in the screenshot below).

Before going any further, verify GPG4win (if the verification software is not verified, this will be a problem…).
If you don’t have one yet, create your PGP key. To do so, open GPA (GNU Privacy Assistant), then in the Keys tab, select New Key... Enter the name of the key in the window that has just opened, then click Next. Enter an e-mail address and click Next. Select Do it later in the next step and continue on to the last step. You now have your very own PGP key, which appears in the GPA list. Cool, right?

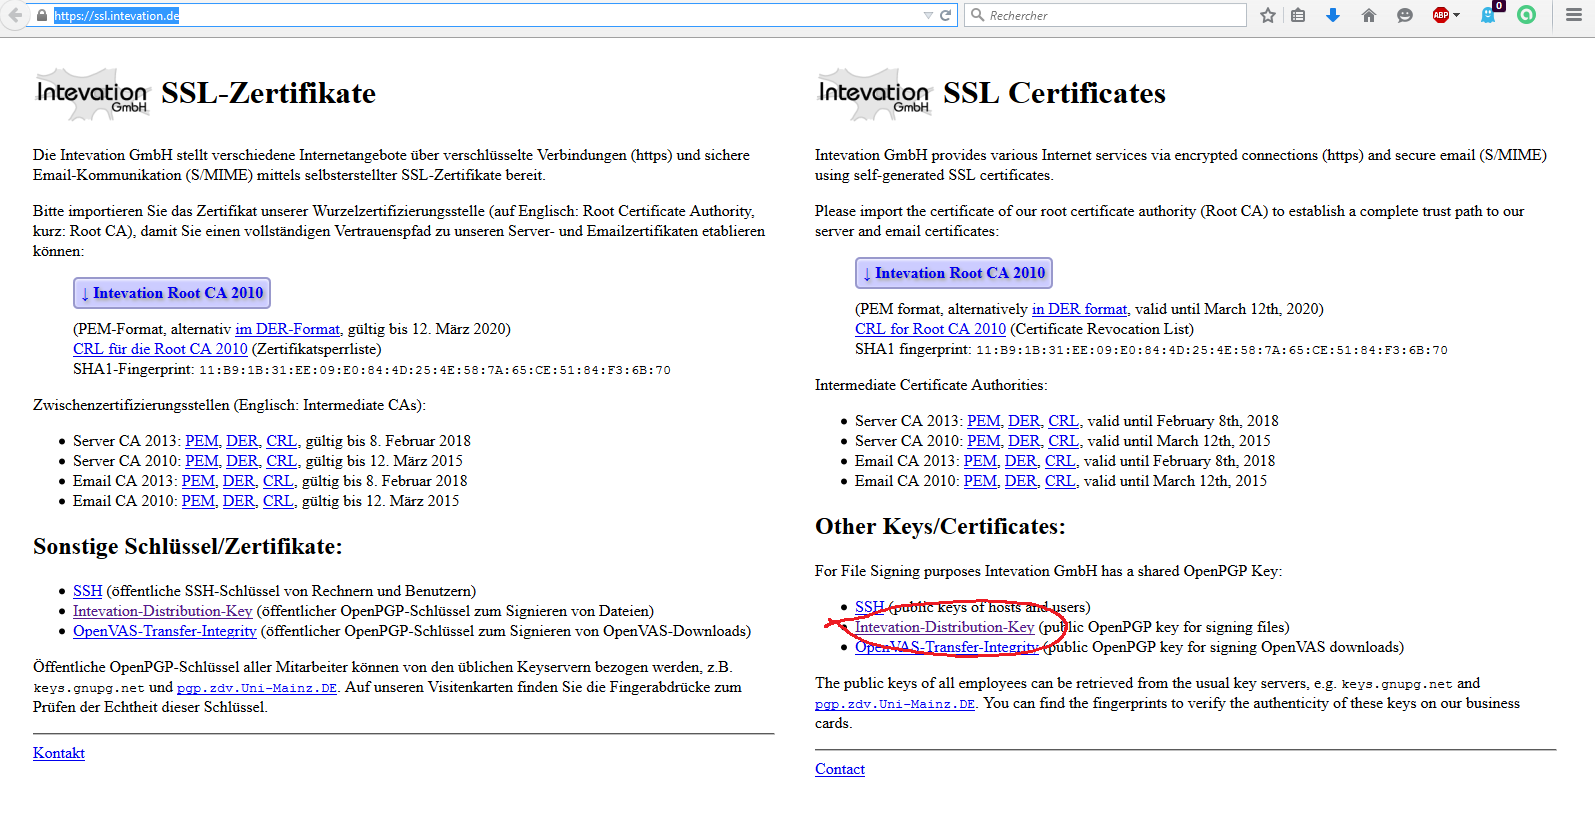
Now all that’s left is to add the GPG4win public key, Intevation. After saving the file (Save target link as…), gp back to GPA, Keys tab, then Import keys, select the newly downloaded file to see it appear in the list. Verify the Intevation key’s digital signature before signing it with your own key.


Indeed, you must also verify the key that will be used to verify the installation of the program that will verify Tails. Hold on tight, you’re almost there!
Select the key that you have just added, then click on the Sign button in the toolbar above GPA. A window pops up to confirm the key’s digital signature, which should be:
61AC 3F5E E4BE 593C 13D6 8B1E 7CBD 620B EC70 B1B8
Click Yes and enter the pass phrase you used when creating your key, in order to verify the key.
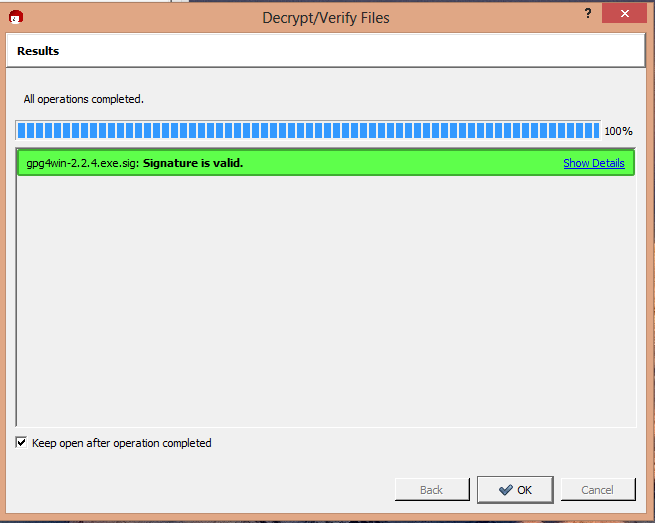
Now you can verify the GPG4win installation. Quit GPA, open Kleopatra, select File>Decrypt/Verify Files… Then find the GPG4win installation file (which must also contain the .sig signature file). Click Decrypt/Verify. After downloading, you should see the message: Installation is verified ! (If this isn’t the case, the problem is probably in the digital signature of the key).
Step 2: download and verify Tails
This step should be child’s play now that you are well versed in verification…
1. Download Tails and its signature file
2. Verify the Tails file
Add the key with GPA, sign it by verifying its digital signature, which should be:
A490 D0F4 D311 A415 3E2B B7CA DBB8 02B2 58AC D84F
Close GPA, and if you followed Step 1, open Kleopatra and verify the Tails installation file.

Step 3: install Tails on a USB key
1. Download and install Universal USB Installer, a little software that lets you install an image (Tails’ .iso) on a USB key. Insert yours into the computer. Be careful to plug the key into a USB 3.0 port! You can format the USB key while installing Tails.
2. Start Universal USB Installer: Click Next, select Tails in the Step 1 drop-down menu, select the image file (tails-i386-1.4.iso) for Step 2, select the USB key on which you want to install Tails. Check the Format Drive box, click Yes. Congratulations, Tails is now installed!
Now all you have to do is reformat the computer and restart from the USB key (instead of your hard drive). This is Step 4.
Step 4: Starting up under Tails
1. Turn on the computer and be ready to access BIOS
At the beginning of the start-up process, you should see the message: Press F2 to enter BIOS. The actual key to press can vary (F2, F12, Esc, Del/Suppr…) Press and hold this key during start-up.

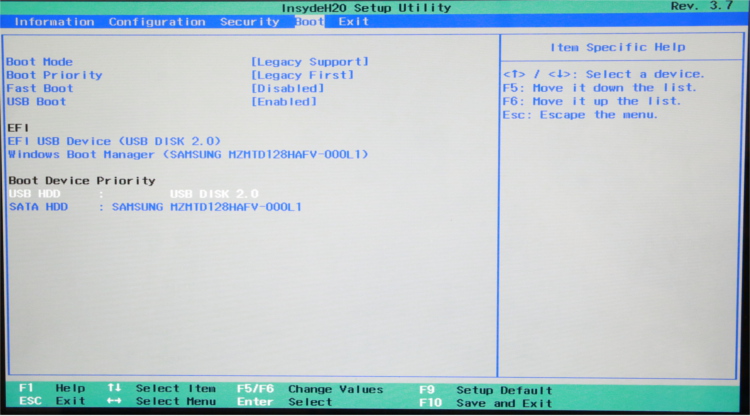
2. In BIOS (the brain of the computer without its Windows or Linux), in the Boot tab:
– Verify that UEFI mode is not activated, and that everything is in Legacy First.
– In Boot Device Priority, put USB HDD at the top of the list, so that the computer searches for an OS to start up from on the USB key, before going to the hard drive. This also allows you to simply start up your computer without the USB key to run Windows normally.
– Save and restart with the USB key (the button is indicated at the bottom, usually F10). This makes the computer start up under Tails, which will ask you to configure a few options, such as Windows camouflage.


And now, under Tails, you can navigate the Internet completely anonymously, without leaving any traces, either locally or on distant servers.
For those who are still apprehensive or just curious about the advantages and limits of TOR (The Onion Router) and HTTPS, two technologies pre-installed on Tails, we recommend the infographic made by the Electronic Frontier Foundation, an independent organization that fights for freedom on the Internet.
To go further and learn how to use your new system: Tails documentation
More info on public-key encryption, the technology behind PGP